
Being an ARK delegate is a serious responsibility, and with great responsibility comes great rewards. Not only in forging rewards, but also the reward of the invaluable knowledge you acquire as you make connections and help secure the ARK blockchain network.
This guide will help you get started with registering a delegate and posting your delegate proposal.
Make your proposal at the community run website: https://arkdelegates.live
ARK Delegates is a community-run project and we are not responsible for its content.
“The price of greatness is responsibility!” — Winston Churchill
How To Register Your Own Delegate?
The first step in your journey to becoming an ARK Delegate is to register your unique delegate name on the blockchain. This name serves as your identifier so others will be able to vote for you.
1. Download latest Desktop Wallet
Download the latest ARK Desktop Wallet for your OS.
2. Prepare your wallet address
Next, you will use one of your ARK addresses (or create a new one) that will become your delegate address. For this guide, we will create a new address and illustrate all of the steps involved. Our delegate will be created on the Development Network or Devnet (you can reproduce the same steps on other networks such as the Public Network — Mainnet or other private / public Bridgechains).
Tip: we strongly suggest you try this first on the Devnet. This will allow you to become familiar with the workings of ARK as you setup your first node and navigate the entire process.
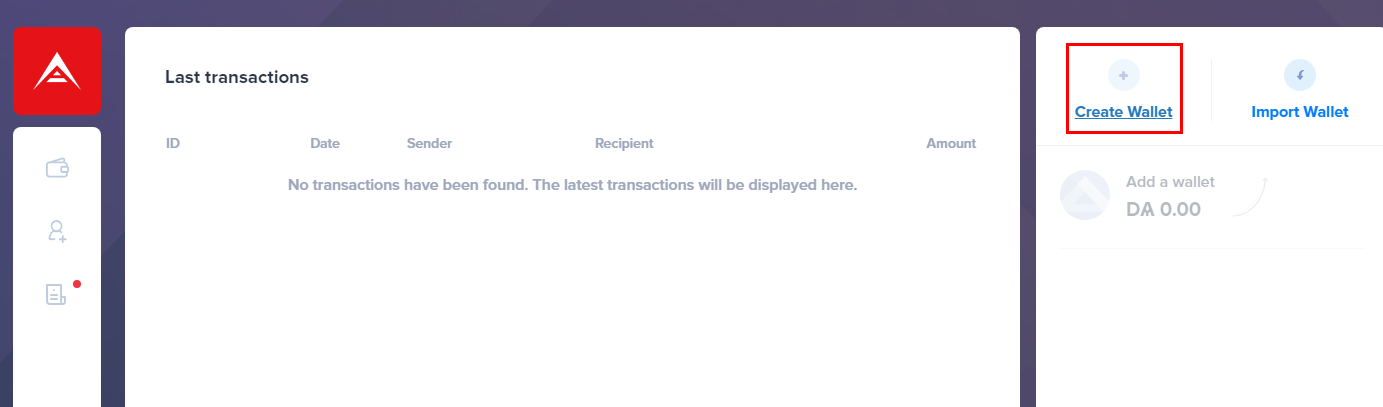
Once in Desktop Wallet, click on ‘Create Wallet’.
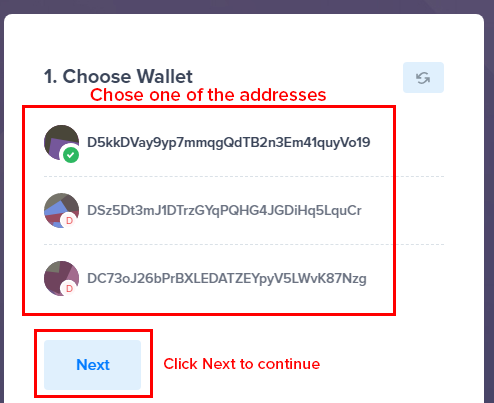
You will be presented with pre-generated ARK (DARK in Devnet) addresses. Chose the one you like. It will then show a green checkmark. You can also click on the refresh button to generate new addresses. Once you make a selection, click ‘Next’ to continue.
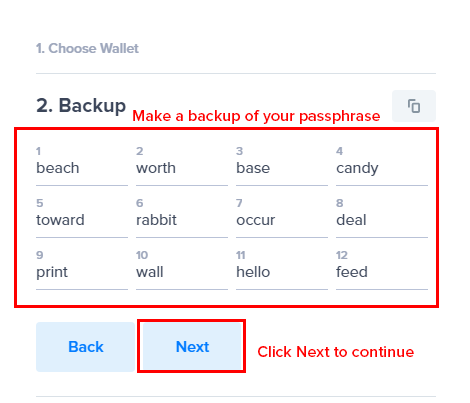
You will be presented with the passphrase corresponding to your selected address. The passphrase consists of 12 words in a specific order — make sure you create a backup! We strongly suggest writing it on a piece of paper and saving it on an encrypted drive. If you lose this passphrase you lose access the ARK address for this account (and in this case, to the delegate). You can use the copy icon to copy it and save it to your preferred medium.
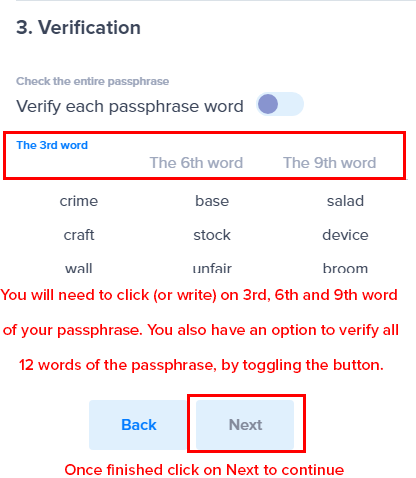
The verification step is where you will confirm you have backed up your 12 word passphrase. If you click ‘*Verify each passphrase word’* you will need to enter the entire 12 word phrase in the correct order. Otherwise you can verify by entering 3rd, 6th and 9th word of the passphrase.
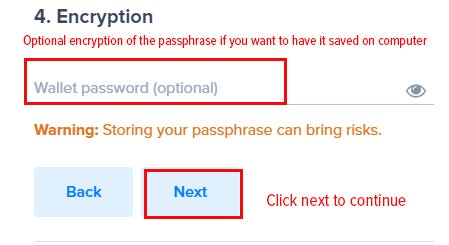
The next step gives you the option to encrypt your passphrase, meaning you can save your 12 word passphrase locally by encrypting it with a custom password. So, instead of entering the entire passphrase to sign a transaction, you can instead sign transactions with your password. If you set a password and then forget it, you can still access your account by re-importing it with the 12 word passphrase. We will skip this step and not enter a password.
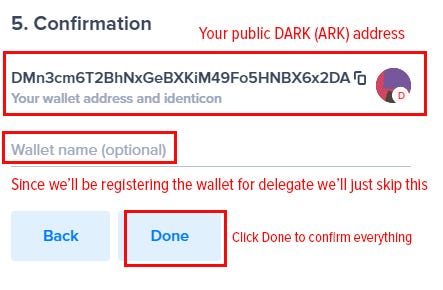
The last step is to confirm the settings of your wallet. Since we’ll be registering it for a delegate we won’t name it.
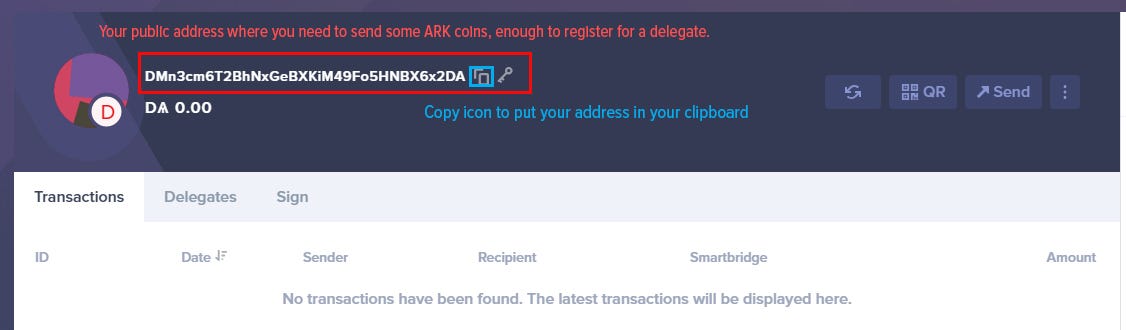
After clicking ‘Done’ you will need to add DARK (or ARK) coins to your new empty wallet. Send coins to the public address seen in the upper left corner of the wallet. You can copy the address by clicking on the copy icon.
You can request DARK (Development coin) on our Discord server.
3. Register your delegate name
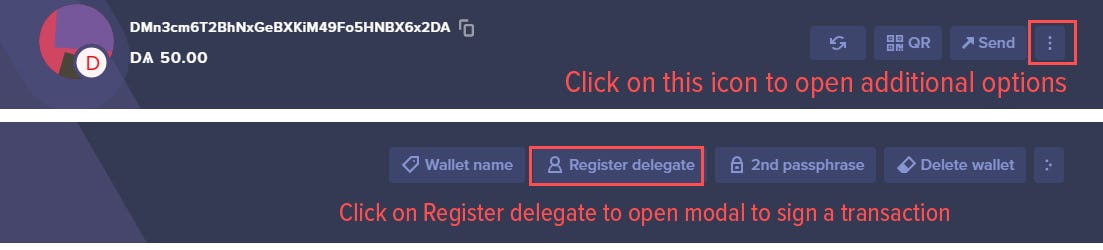
Once you have coins in your wallet you can register your delegate. This is done by clicking the 3 vertical dots in the upper right corner. Additional options appear including the ‘Register delegate’ button.
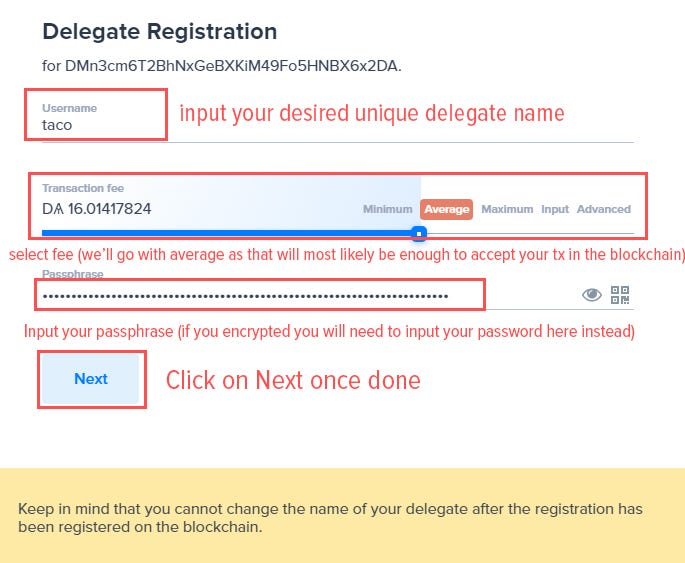
Now you can input your unique delegate name. You must use lower case letters, and the name can also contain numbers and some special keys [!@$&_.]. The name must not have already been used, cannot contain spaces, and can be up to 20 characters in length. We suggest you use something memorable and short so others will be able to find you. We will register a delegate with a name ‘taco’, select the average fee, and input our passphrase. If you encrypted your passphrase at the wallet creation page you will need to input your password instead. Click ‘Next’ once you are done.
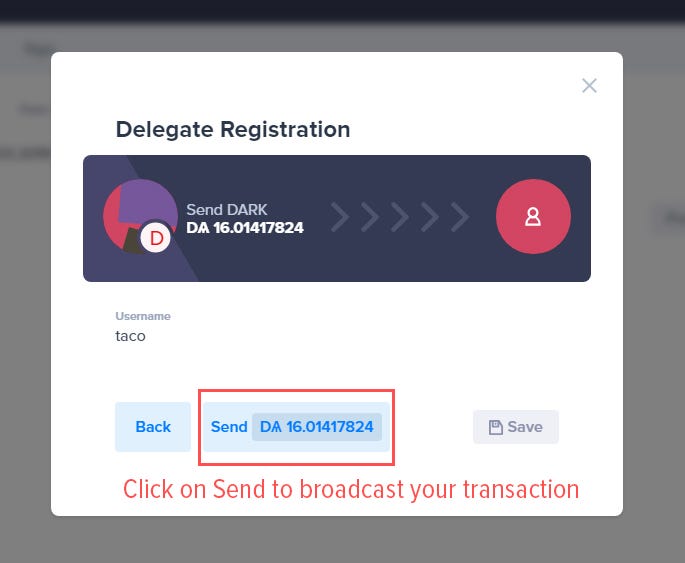
The final step is to review and sign your transaction by pressing the ‘Send’ button. This will broadcast your transaction to the network.
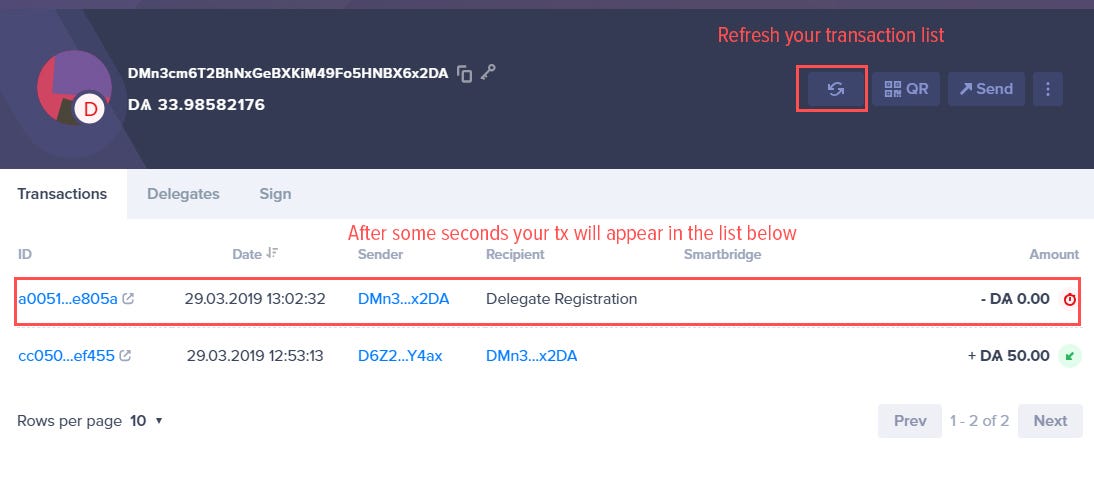
That’s it! Now you only need to wait for the tx to be confirmed and included in a block. Wait a few seconds, and click on the refresh button in the upper menu. You will soon see your Delegate registration tx in the list below.
After next wallet restart, you will also see your delegate name in the upper corner of the wallet:

We are now ready to go on to the next step — setting up your server.
4. Setting up new ARK Core server
As a final step, you will need to prepare and configure your server for it to be ready to process blocks and transactions, if you are voted into the active delegation. For that, we have prepared a detailed guide for you to follow here:
If you run into any kind of troubles don’t hesitate to join our Discord
5. Registering 2nd passphrase (optional)
If you will be running a delegate, we strongly recommend registering a 2nd passphrase for your wallet. This optional step can prevent catastrophe if an unauthorized person gains access to your server where your delegate is running (and if you set a plain passphrase on the server). If a hacker gets access to your 1st passphrase they won’t be able to steal funds if you have registered a 2nd passphrase, since both are needed to sign transactions.
WARNING: make a backup of your 1st and 2nd passphrase. If you lose either, you will lose access to your account and will no longer be able to send and sign transactions.
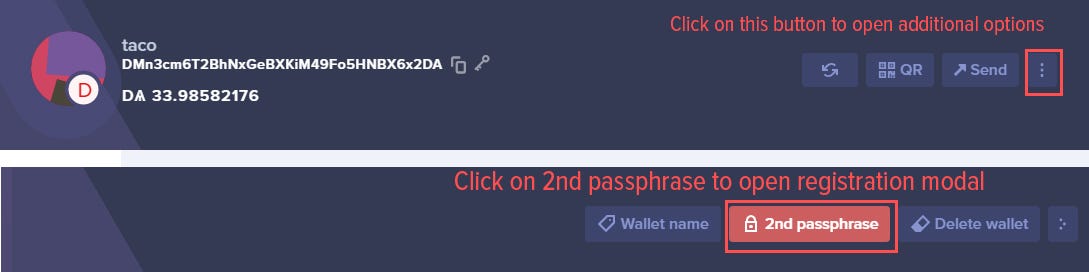
Once in your wallet, click on the 3 vertical dots icon in the upper right corner to open additional options, and after that, click on the ‘2nd passphrase’ button.
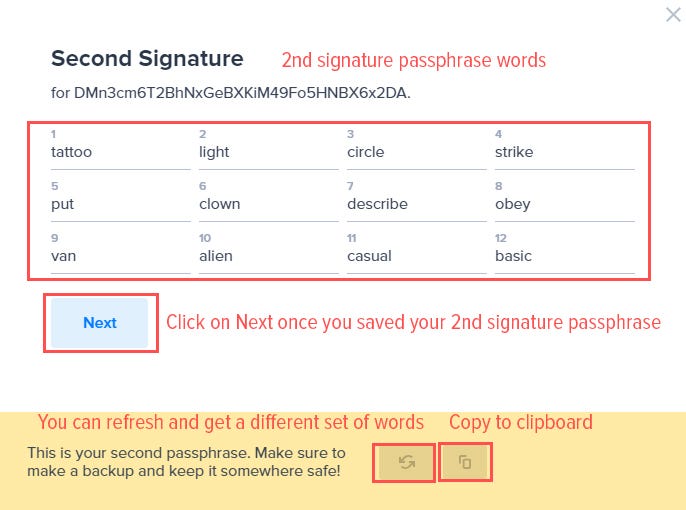
You will be presented with a 2nd signature passphrase (again consisting of 12 words). Write them down properly and copy to a secure medium. You also have a refresh button if you wish to change them, and copy to clipboard if you want to paste your passphrase somewhere for storing. Click ‘Next’ once you have it backed up.
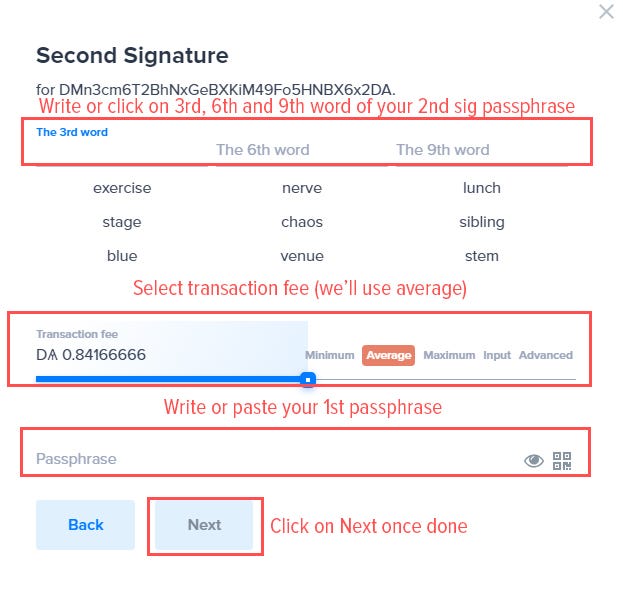
You will now need to confirm your 2nd passphrase and sign its transaction. Write or click on the 3rd, 6th and 9th word from your previously saved 2nd signature passphrase to confirm, select a tx fee and write or paste in your 1st passphrase. After you are done with the steps click on ‘Next’.
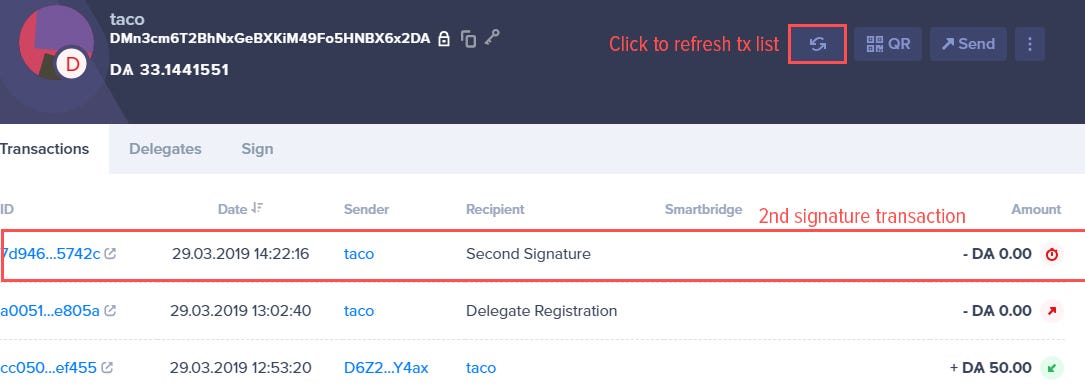
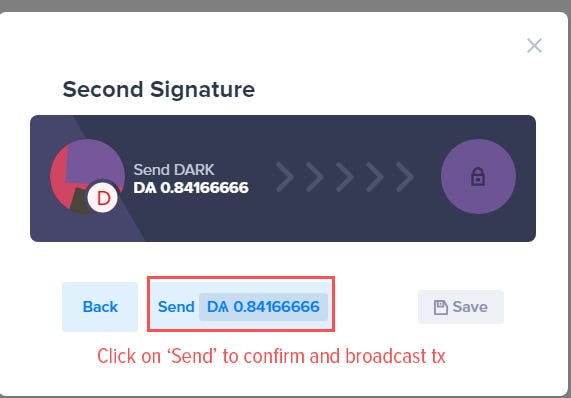
The last step is to confirm and broadcast your 2nd signature transaction. Click on ‘Send’.
All done! You have now successfully registered a 2nd passphrase for additional security. You can refresh your account by clicking on the refresh icon and see your tx in the list!