Welcome once again to the fourth tutorial in our series explaining how to launch an HTML5 game in the Desktop Wallet by writing an ARK Core plugin and using Construct 3 for the client. In this part, we will implement turn-based game logic into our Connect 4 game by reading the smartbridge (also known as the vendorfield) messages of transactions sent to our generated game addresses to fill up the game board and keep track of whose turn it is.
Implementing Game Logic
Let’s go through the rules of the game so we implement our logic correctly(we are using the connect four game for example):
- There are 7 columns that can each hold 6 discs.
- Each player takes a turn to insert 1 disc into any of the columns that are not full.
- The first to place 4 of their discs in an unbroken line, either vertically, horizontally or diagonally wins and the game ends.
- If the board is full and nobody has placed 4 discs in a valid line, the game ends in a tie.
As there are 7 columns, our smartbridge message should be 1, 2, 3, 4, 5, 6 or 7 to represent each of the available columns. If player one sends a transaction with a smartbridge message of 3 then our board would be like this:
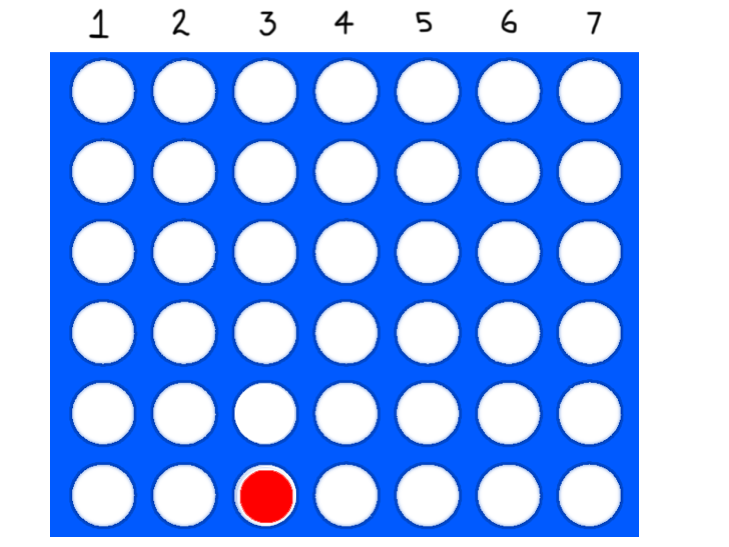 Smartbridge message with value of 3, inserts disc into row number 3
If player two also sends a transaction with 3 as the smartbridge message, their disc will be stacked on top of the previous one as it is in the same column:
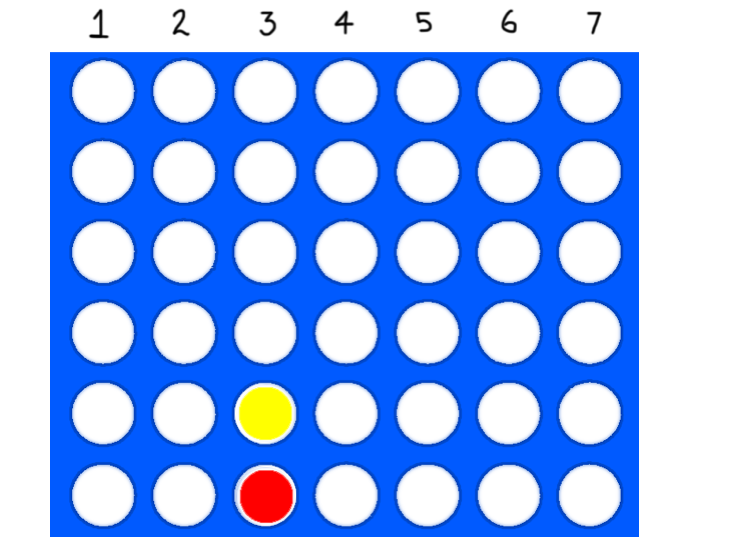 Our board after the second move
If a chosen column is full, or a player sends a transaction out of turn, or a non-participating wallet sends a transaction to the game address, the move will be considered invalid and ignored.
Now that we’ve mapped out our game logic, it’s time to code it up. As usual, all of our Core plugin code lives in manager.ts so let’s not waste any time and open it up to begin! Most of our work on our Core plugin today will be on the generateState function that we started in the previous part of the tutorial series. We’re going to extend it to process messages in the smartbridge field of transactions to update the state of our game board according to the rules we just described.
We’re going to start by finding the following block that we wrote last time:
for (const transaction of transactions) {
    if (transaction.senderId !== address && transaction.senderId !== players[1] && transaction.amount === wager) {
        players[2] = transaction.senderId;
        break;
    }
}
Replace it with this:
let transactionCounter = 0;
for (const transaction of transactions) {
    if (transaction.senderId !== address && transaction.senderId !== players[1] && transaction.amount === wager) {
        players[2] = transaction.senderId;
        break;
    }
    transactionCounter++;
}
We do this so that we count the number of transactions that it took for us to match a valid wager, so we can disregard those transactions when we actually generate our game board. The reason for this is to stop cheaters from creating a new game with a wager and a valid smartbridge value in the same transaction that would trigger a move on the board too early.
Next up, find the following line that we wrote in the last tutorial:
this.gameStates[address] = { players, wager };
Replace this line with the following code block beneath it:
const board: Array = [];let turn: number = 0;let outcome: string | number = “ongoing”;
So, we’re declaring some new variables: board, outcome and turn. The board variable will contain an array holding the state of each column on the board. The outcome variable will be used to store who has won the game, if it is still ongoing, or if it is tied, and turn determines whose turn it is; we’re initializing it to zero until we know we have 2 valid participants (and then player 2 always starts since they were the last to join the game).
Now add the following code block:
if (players[2]) {
    turn = 2;
    for (let i = 0; i < 7; i++) {
        board.push([]);
    } // We'll add more here
}
this.gameStates[address] = {
    board,
    outcome,
    players,
    turn,
    wager
};
This means the rest of our board generation logic will only execute if we have two valid players, which sets the initial turn to belong to player 2 and initializes 7 empty columns on our board array. The last line means that our game client will receive information about the board state, the game outcome, the participating players, whose turn it is and the wager amount.
Next, we will add the following code block:
const moves = transactions.slice(transactionCounter + 1).filter(transaction => !!transaction.vendorField);
for (const move of moves) {
    if (move.senderId === players[turn]) {
        const column = parseInt(move.vendorField)— 1;
        if (!isNaN(column) && column >= 0 && column {
                if (event.data) {
                    runtime.callFunction("IPC", event.data);
                }
            });
        window.addedEventListener = true;
    }
You’ll notice that our code calls a function IPC, or inter-process communication. We need to create this function ourselves, but it will be very simple. It will just listen for a message containing the game address, store it in a variable and move us into a new game layout. But wait! Before we make our function, we must add our new game layout. Right-click Layouts in the Project menu and choose Add layout. Opt to also create an event sheet when asked. Then return to our Event sheet 1 as before.
At this point, it’s wise to rename our layouts and event sheets to avoid confusion. Right-click Layout 1 and rename it to Lobby Layout. Do the same for Event Sheet 1, calling it Lobby Event Sheet. Then rename Layout 2 to Game Layout and Event Sheet 2 to Game Event Sheet.
Let’s create that function. Right-click an empty area of the event sheet and choose Add function. Call it IPC and leave everything else as it is. Right-click our new function and choose Add parameter. Call itMessage and set its type to String. Click OK. For now, we’ll leave our function empty and come back to it in a few minutes.
To add our link to watch an ongoing game, we’ll edit the existing code in our ParseLobby function. Scroll through our event to locate that function, then find the following code blocks:
for (const game of existingGames) {
    const wager = game.game.wager / 100000000;
    html += "Game between " + game.game.players[1] + " and " + game.game.players[2] + " for " + wager + runtime.globalVars.Symbol + "";
}
for (const game of ourGames) {
    const wager = game.game.wager / 100000000;
    html += "Game between " + (game.game.players[1] === runtime.globalVars.ValidatedAddress ? "you" : game.game.players[1]) + " and " + (game.game.players[2] === runtime.globalVars.ValidatedAddress ? "you" : game.game.players[2]) + " for " + wager + runtime.globalVars.Symbol + "";
}
We’re going to replace them with code blocks that also include a link to watch our game, which will work by sending a message from the iframe to our game, containing the address of the game we want to watch.
for (const game of existingGames) {
    const wager = game.game.wager / 100000000;
    html += "Game between " + game.game.players[1] + " and " + game.game.players[2] + " for " + wager + runtime.globalVars.Symbol + " (Watch)";
}
for (const game of ourGames) {
    const wager = game.game.wager / 100000000;
    html += "Game between " + (game.game.players[1] === runtime.globalVars.ValidatedAddress ? "you" : game.game.players[1]) + " and " + (game.game.players[2] === runtime.globalVars.ValidatedAddress ? "you" : game.game.players[2]) + " for " + wager + runtime.globalVars.Symbol + " (Watch)";
}
Now, about that empty IPC function. As this will be processed by the game layout rather than the lobby, we’re going to add a new global variable in the Game Event Sheet instead. Switch to that, right-click the empty sheet and choose Add global variable. Call it GameAddress which should be a String. Add another global variable called TurnAddress which is also a String. Flip back to our Lobby Event Sheet and, in the IPC function, add a couple of actions. The first will be System > Set Value and choose to set the GameAddress variable to the value Message. Our second action will be System > Go to layout. Pick Game Layout from the list, click Done and we are indeed done with our lobby!
All the remaining work will take place in the Game Layout and Game Event Sheet. We’ll design our board and discs and add some text to indicate whose turn it is and the status of the game. To do this, head on over to our Game Layout.
Right-click our empty layout and choose Insert new object. We’ll be adding a Sprite this time. Call it Board and you’ll see the Animations Editor open. Choose the Fill tool and pick the color of your choice for the board and fill our sprite with that color. Close the Animations Editor and resize our board to 480x480 pixels.
Repeat the process, adding another Sprite. This time call it Disc and draw a white circle using the Ellipse tool. Call the animation name 0, and also set the Speed and Repeat Count to 0. Right-click the 0 in the Animations panel and choose Duplicate. Call the duplicated animation 1. Duplicate it again and call it 2. Choose 1 and fill the circle with a red color. Choose 2 and fill it with a yellow color. These are our game discs: player 1 will be red, player 2 will be yellow.
Close the Animations Editor and then click our new disc in the layout. Choose the Instance variables option from the Properties window and pick Add new instance variable. Call the name Column with a type of Number. Add another instance variable and call it Row, again with a type of Number. Resize our disc to 60x60 and place it in the bottom left corner of our board. Copy and paste our disc object to build a grid of 7 columns and 6 rows. Click each disc and set the Column and Row instance variable values correctly, so the bottom left disc is Column 0, Row 0, the next disc up is Column 0, Row 1, and so on, with the bottom right disc being Column 6, Row 0 and the top right disc being Column 6, Row 5. Remember how JavaScript arrays start from 0!
Almost done with the layout! We need to add a text box to indicate whose turn it is, or if the game is over. Let’s do that now. Right-click our layout and pick Insert new object. Add a Text object and call it StatusText. Drop it somewhere above the discs and set the color to white so it’s readable on the blue background. Increase the width of the text box so it covers the entire width of our board. The very last thing to do is to add a Mouse object so we can interact with mouse events: this is so we can send a game transaction with an encoded smartbridge message when the player clicks on a column to play.
We’re now done with our layout. Time to head over to the Game Event Sheet! Add a new empty function and call it ParseBoard. Then add a new event, WebSocket > On text message whose action is JSON > Parse. The JSON string to parse is WebSocket.MessageText. Now, add a sub-event within the Websocket -> On Text Message event. Choose JSON and then Has Key. Enter “games” then press Done. Click Add action for our newly created sub-event and drill down to System > Set value. We want to set our JSON object to the value of JSON.get(“Games”). Click Done. This is the same event that we also created in our lobby, but we also need it to fire while in the game too so our client updates when the game state changes. Add a further action to this sub-event: Functions > ParseBoard as this function will be responsible for updating the state of the board.
We also need to update the board as soon as the game layout opens, so let’s create another event. Go to System > On start of layout. The action should be Functions > ParseBoard.
Time to write our ParseBoard logic! We’re going to pick the game that we want by using the GameAddress that we saved earlier and display whose turn it is. If the address of the player whose turn it is matches our own validated address, we will print “You” instead of the address. So, let’s go!
const games = JSON.parse(runtime.globalVars.JSON);
const game = games[runtime.globalVars.GameAddress];
let text = "";
runtime.globalVars.TurnAddress = "";
if (game.outcome === "ongoing") {
    text = `Current turn: $ ($)`;
    runtime.globalVars.TurnAddress = game.players[game.turn];
} else if (game.outcome === "tie") {
    text = "Game tied!";
} else {
    text = `Winner: $!`;
}
if (runtime.globalVars.ValidatedAddress) {
    text = text.replace(runtime.globalVars.ValidatedAddress, "You");
}
runtime.objects['StatusText'].getFirstInstance().text = text;
Hopefully, by now you can understand how this works. We extract our game from the list of games by using the GameAddress variable, and then check if the game is ongoing. If so, we show the address of whose turn it is, and the color they play (remember, player 1 is always red and player 2 is always yellow). If the outcome is tied or there’s a winner, we’ll display that information instead. Also, if the address matches our ValidatedAddress, meaning it’s us, we replace that address with “You”. We also store the address of the current player in our TurnAddress variable if the game is not over, otherwise, the value is cleared.
Let’s now expand our ParseBoard further to change the color of the discs to represent the current state of the board:
const discs = runtime.objects['Disc'].getAllInstances();
for (const column in game.board) {
    let row = 0;
    for (const position of game.board[column]) {
        const disc = (discs.filter(disc => disc.instVars.Column === parseInt(column) && disc.instVars.Row === parseInt(row)))[0];
        disc.setAnimation(game.board[column][row].toString());
        row++;
    }
}
This iterates through all the columns in the board data received from the WebSocket and sets the color of the matching disc at each column and row.
Now what’s left is to allow the current player to send a transaction to the game address using the smartbridge value for the column we want to place our disc in. To do this, we’ll add another event. Choose Mouse > On object clicked. We want to act when the left button is clicked on a Disc object. But that by itself is not enough, we want to only execute this when it’s our turn and if the chosen column is not full. So right-click our new event and Add another condition. Choose Disc > Is Playing and enter “0”. This means our action will only trigger if the disc is white, i.e. it has not already been played (otherwise it would be 1 for red or 2 for yellow). Finally, we only want to trigger this when it’s our turn, so Add another condition again, and this time pick System > Compare variable. Choose ValidatedAddress as the variable, and TurnAddress as the value.
Our action for this new event is Browser > Go to URL. We want to use the ark URI scheme to send a transaction from our player’s wallet to the game address, with a nominal value of 1 arktoshi, with the smartbridge message of the column we’re placing our disc in. This can be achieved with the following URL in our Construct 3 action: “ark:” & GameAddress & “?amount=0.00000001&vendorField=” & (Disc.Column + 1) & “&wallet=” & ValidatedAddress
Next Steps
Congratulations, you have now created a playable blockchain game! But you’ll have probably noticed that the winner doesn’t receive a prize, and if there’s a tie the players don’t get their wager back. That’s the focus of the next part in our tutorial series, where we look into how game prizes are calculated, awarded and paid out.
If you become stuck at any point make sure to consult our documents on the Learn ARK hub. In addition, our team and developers are active on Slack so do not hesitate to reach out to us!
Check out previous posts in this series for reference here:
- Part One: How to import an ARK wallet address into your application
- Part Two: Creating the Backend for your Plugin
- Part Three: Making your game work with a betting system

